Sewing Part 1 Sewing Part 2 Sewing Part 3 Sewing Part 4
Sewing a Traditional Doukhobor Woman's Suit
A Cultural Interpretive Society Workshop Presented by Irene Tamelin - January 2003
Materials and Notions Required
Fabric: 5 to 6 metres of 45 inch/115 cm or 60 inch/150 cm, depending on height of person and style of blouse.
How to determine length required:
a. For skirt – 3 “lengths”. To measure “length”, add the following: length of skirt from waist to 9 inches above the floor with shoes on (eg. 32 inches, plus 8 inches for hem and seams. Then multiply by 3.
(eg. 32” + 8” = 40 x 3 = 120 inches or 303 cm or 3.1 metres)
b. For blouse – the length of fabric on blouse pattern (eg. 2.1 metres)
c. Total length required for skirt and blouse (eg. 3.1 + 2.1 = 5.2 metres)
Notions:
1. 3 spools of matching sewing thread and matching serging thread
2. .3 metres of ½ inch elastic
3. 1 button (1/2 inch) for skirt
4. All notions as specified for blouse style
1. Shrink fabric – Place folded fabric in a tub of water, same temperature as would be used when washing the finished garment. Keep fabric in the water for four (4) hours. Squeeze out the water and unfold fabric just enough to hang over clothes line to dry.
2. Straighten fabric
a. Straighten ends by tearing or pulling a thread and cutting.
b. Straighten grain line by pulling diagonally. Because length of the fabric is long, measure three skirt lengths. Length of each piece for the skirt is determined by measuring from waist to 9 inches from the floor with shoes on and adding 8 inches.
c. Cut and straighten each piece individually including the left over piece for the blouse. **** Mark top and bottom of each piece to ensure pattern and sheen (nap) all are going the same way.
Sewing the Skirt
1. Sew 2 pieces together. Finish seam edges (serge or overcast stitch) and press seam open.
2. Choose width of pleat to fit front waist measurement. Suggested pleat widths:
a. 1 ¼ in. x 8 pleats + 3 ¼ in. (centre pleat) = 13 ¼ inch (side to side) front
b. 1 3/8 in. x 8 pleats + 3 ¼ in. (centre pleat) = 14 ¼ inch (side to side) front
c. 1 ½ in. x 8 pleats + 3 ¼ in. (centre pleat) = 15 ¼ inch (side to side) front
d. 1 5/8 in. x 8 pleats + 3 ¼ in. (centre pleat) = 16 ¼ inch (side to side) front
e. 1 ¾ in. x 8 pleats + 3 ½ in. (centre pleat) = 17 ½ inch (side to side) front
f. 1 7/8 in. x 8 pleats + 3 ½ in. (centre pleat) = 18 ½ inch (side to side) front
g. 2 inches x 8 pleats + 4 in. (centre pleat) = 20 inch (side to side) front waist
Suggested overlap of pleats = 3/8 inch.
3. Mark pleats (Follow Diagram A)
a. Start from right side and work towards left side of fabric with right side of fabric up.
b. If the plan is to press down the pleats, mark them down now by repeating the measurements on the hem as on the waist and joining these markings by drawing lines with soap and ruler on the wrong side of the fabric. Machine baste using long stitches on top of these soap lines (optional).
c. Pleat front waist by folding on lines indicated in Diagram A. Baste on waistline seam to hold pleats in place.
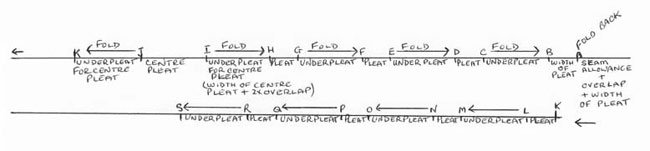
Diagram A
4. Sew remaining piece of skirt to left side of pleated fabric. Finish edges and press open.
5. a. If waist measurement is less than 38 inches, measure from fold of last pleat to centre back seam. Take that measurement, plus the width of pleat, plus the overlap, plus the seam allowance and mark that measurement to the left of centre back seam. On this marking cut away the remaining piece of fabric.

Diagram B
5.b. If waist measurement is 38 inches or more, then use all the fabric. To find centre back in this case, allow for seam allowance, overlap and width of pleat on left side of the fabric. Measure the remaining fabric up to the fold of last pleat on the right side of the fabric. Divide this measurement in half to find centre back. Mark this on fabric.

Diagram C
6. a. To pleat the back skirt, take waist measurement (eg. 32 inches), subtract the pleated front of skirt (eg. 16 ¼ in.) and add 2 inches.
Example: 32 – 16 ¼ = 15 ¾ + 2 = 17 ¾ inches
b. Decide the width of back pleats (suggested 1 ¼ in. or less). Divide this measurement (eg. 17 ¾ in.) by width of back pleats (eg. 1 ¼ in.) to find the number of back pleats. If the answer is an uneven number (eg. 15) then bring it up to the next even number (eg. 16) of pleats.
c. Divide this number of pleats by 2 and multiply by width of pleat.
14 divided by 2 = 7 x 1 ¼ = 8 ¾ inches
d. Subtract this measurement from measurement of unpleated fabric from fold of last pleat to centre back marking (eg. 33 inches)
33 in. – 8 ¾ = 24 ¼ inches
e. Divide this measurement by half the number of pleats.
24 ¼ divided by 7 = 3 3/8 in. (approx.)
This is the measurement to fold under – the underpleat.
Transfer markings to skirt starting with width of pleat, then the underpleat and so on to centre back. Reverse markings until you reach the marking of the measurement that goes under the front pleat of skirt (width of front pleat plus overlap plus seam allowance). See Diagram D.
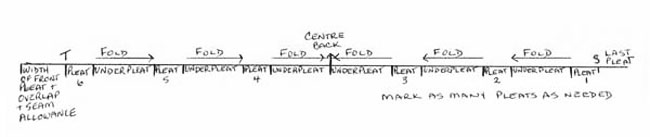
Diagram D.
f. Fold, pin and baste pleats as indicated in Diagram D.
7. Join remaining seam and sew up to within six inches of waist line. Finish seam edges and press open. Insertion of zipper is optional.
8. Cut waistband 2 ½ to 2 ¾ inches wide and long enough to fit waist of skirt plus 5/8 inch seam allowance on both ends.
9. With right sides facing together, pin one side of waistband to skirt waist. Stitch using 5/8 inch seam allowance.
10. Elastic (1/2 inch wide) in waistband will be placed about 2 inches from each side of back waist. Measure this distance between these markings and cut elastic 2 to 3 inches shorter. Stitch elastic at both ends to back of waistband seam allowance, stretching it to fit. Sew up both ends of waistband. Fold over back side of waistband to cover elastic and hand stitch (overcasting stitch) in place. Using large zig-zag pattern, stitch through all thicknesses to keep elastic in place (optional).
11. Turn up hem 6 – 7 inches. Finish raw edge of hem and hand stitch in place.
12. If pressing pleats down, pin the pleats all the way from waist to hem on the marked lines and press.
Sewing the Blouse
1. Buy suitable blouse pattern by bust size.
2. Lengthen or shorten blouse pattern where indicated.
3. Check position of highest point of bust by:
a. measuring from bust point to bust point ( eg. 8 inches). Mark ½ of this measurement on pattern.
b. measuring from shoulder to bust point (eg. 10 ½ inches). Mark this measurement on pattern. The bust point is where the two markings meet. Dart should be pointing to bust point. If dart marking is too low or too high then it has to be corrected. To do this, draw lines at right angles to the front centre line above the dart and below the dart ( lines a and b in Diagram E). Draw another line parallel to the front centre line (line c).
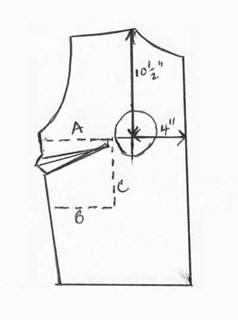
To lower dart, cut along lines “a” and “c”. Make a pleat on line “ b” wide enough to lower the dart to the proper position.
To lift dart, cut along lines “b” and “c”. Make a pleat on line “a” wide enough to lift the dart to proper position.
4. Draw
a. 2 inch radius circle around bust point for full bust or
b. 1 ½ radius circle around bust point for medium bust.
Dart should not enter this circle unless it is used for decorative effect. If dart does enter the circle then it should be shortened by redrawing it.
Sew blouse according to pattern instructions.
Diagram E
To Previous Page in This Section To Next Page in tthis Section