Traditional handcrafted Doukhobor looms are now part of the artifacts housed at the Discovery Centre, a local Doukhobor Village Museum, and other museums in the Kootenay Boundary Area. Here a visitor can see how rugs were woven during the communal days of early Doukhobor settlements in British Columbia.
View Examples of Doukhobor
Rugs in Our Web Gallery
Weaving Part 1 Weaving Part 2 Weaving Part 3
Weaving a Traditional Doukhobor Rug
Tips for good rug making as presented by Mabel Verigin (Canadian Master Weaver) at a workshop for the USCC Cultural Interpretive Society in the Fall 2001.
RAG PREPARATION (Traditional Doukhobor Way)
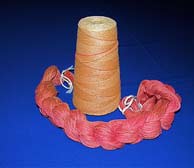
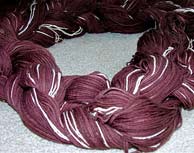
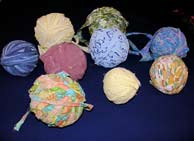
Wash and dry old clothes or sheets that are being used for the weft. Cut off all seams, pockets, buttons, zippers. Cut the rag evenly in strips about ¾ inch wide. The ends are cut straight across. Lay one piece of rag on top of another, overlapping about ½ inch. Fold them together lengthwise, and hand sew through the four thicknesses with a few overhand stitches, securing the thread in the centre of the fold. Continue to add strips of cloth and sewing. Use all different colors for an interesting hit-and-miss technique. If wishing to do stripes, then sew the stripes in a strand of one single color. Wind the weft into big balls and store until ready to weave.
When winding the shuttle, cut the weft at an angle away from the stitching. Long sheets may be torn instead of cutting. Remove all the frayed ends. Tearing the cloth is faster, but takes longer to pick off all the ravels.
Now, preparation of rag weft can be done in any usual modern speedy technique, especially with the use of rotary cutters.
WARP
Sturdy, non-stretchy fibre, rug cotton (8/4), seine twine (12) or linen (4/10 or 4/12). Warp cotton that is too thin or too soft will not produce a sturdy rug, no matter how hard the beat. For practice rugs or a small mat, doubled 8/2 cotton can be used. Always use doubled selvages.
SETT
If using single rag weft cut ½ inches wide, sett the warp at 5 epi to obtain a weft face rug in plain weave. This will produce a sturdy, flexible rug that will be easy to wash in the washer. If using the traditional ‘Doukhobor twill’ draft sett the warp at 8 epi and use doubled weft or wider cut rag strips. Always use a double selvage thread at each side, threaded through one heddle.
BEAT
Good rug weaving does not require a heavy beat. The recommendation is to have a very tight warp. A counterbalance loom is better than a jack loom for rug weaving, but a jack loom can certainly be used with success. The shed will be a little smaller so shuttles should not be wound too full. “I always throw my weft through, make my proper arch to prevent draw in, check my edge, beat on an open shed, then change sheds and beat again.” The secret to a firm rug is to keep a good distance from the reed at all times. Advance the warp every two inches or so. Use a temple for any rug wider than 16 inches.
If a temple is not available, remember to allow the proper amount of slack in the weft to prevent excessive draw-in. The end warps will stretch as weaving progresses without a temple. Watch for loose warp at the selvages. If warp becomes loose, weight it at the back.
TO START THE RUG
“Dress” your loom as per length and width desired using “Doukhobor twill” draft.
Tie the warp in small bouts to the front apron rod. Do not tie the outside edges until the last. Use only four warp threads on each side for the two final bouts. There should be two threads in one heddle at each edge for a firm selvage. If using linen warp, lash the bouts rather than tying them into knots. Make sure every warp thread is evenly pulled tight. Loose warp threads are a nuisance to work with. Some warp threads may come loose during the weaving and will have to be weighted at the back. If attention is paid to beaming, this should not occur.
When the warp is tied, to spread the warp use four shots in plain weave with filler strips (plastic cleaner bags and pantyhose works well.) The next four picks will be in wool or scrap rag. At this point, weaving of the rug will begin. Decide in advance what finish will be used at each end and proceed to incorporate it now.
-
If the end is to be finished in overhand knots, use four picks of doubled warp thread. Secure the ends by weaving in about three inches at start and finish. Proceed with rag weaving.
-
If a binding is to be used, weave a hem of about ½ inch with a doubled warp thread.
-
If machine hemming the rug, weave for one inch with doubled warp thread.
In all instances, beat hard for a firm edge. Remember to arc the weft to prevent draw-in. If the Scandanavian knotted edge is the preferred finish, leave at least four inches of fringe on finished end. If weaving only one rug, the loom waste will be sufficient.
Always start weaving the rug on the treadles that have harnesses 2 and 3 tied to them. This starts a nice edge with no long skip. Continue to treadle in “Doukhobor” twill for the desired length.
REMOVING RUG FROM LOOM
The end of the rug needs to be secured before removing it from the loom. To secure the end weave in four picks of scrap rag (after you have woven the finished edge). Then weave in four picks of plastic bag, then two or three picks of wool. Loosen the brake on the loom and advance the warp until it is just sagging a little. Cut the warp threads two inches from the last picks of wool. Carefully unroll the rug from the front beam. Cut warp close to the knots. Roll the rug up and carefully transport it to the table where the edges will be finished. If machine hemming, take it to the machine immediately and sew the hem, using a multiple zig-zag stitch at the edge, then fold up the edge twice and stitch in place. (Remove the plastic and scrap rag after the first stitching and cut the warp threads even with the edge.)
If the edge is to be tied in square knots, lay the rug on the table and weigh it down with some heavy books. Remove only a few warps at one time and tie them in overhand knots, pushing the edges evenly. Proceed carefully so the edge weft does not get loose. Trim fringe to 3 inches.
BLOCKING AND STRAIGHTENING RUG
Spread a sheet of plastic on a hard floor (an old plastic table cloth is great). Dampen a towel or flannel sheet and spread on top of plastic. Place rug on this and cover with a damp towel or two. Leave it alone for a day or overnight. When the dampness has penetrated the rug, straighten it by pulling diagonally in all directions. Lay it on a dry floor and pat it down flat. Let dry and your rug is ready for use. It is not necessary to wash it before use, as in other weaving.
WASHING THE HANDWOVEN RUG
The best way to prolong the life of a handwoven rug is to wash it by hand with liquid soap in a bathtub. Let it soak for an hour or so, swish it around a bit, scrubbing any stains off with a brush, rinse two times, drain the water while rug is in the tub, roll the rug up, give it a twist to remove most of the water and dry on a railing outside or on a drying wooden rack. The best thing is not to let the rug get too soiled before washing it.
If choosing to wash the rug in the machine, use cold water and liquid soap and agitate for only five minutes. Dry in dryer on regular setting, removing it while slightly damp. Lay the rug on the floor and finish drying. In this way, the rug flattens and blocks to its original shape. If the rug over dries in the dyer, steam pressing will make it look nice again. If one type of weft (for example, all cottons) is used in the rug, washing a drying in a machine is no problem. Mixed fabrics may shrink differently. If the rug is machine hemmed, some shrinkage may occur making the rug a little narrower at each end.
When shaking the rug, hold it warpwise (lengthwise in the middle) not on the ends. This prevents the rag weft from loosening and compromising the hem.
HINTS
Plan the stripes of your rug before starting the weaving. Lay all the balls of weft in the order of use. If enough shuttles are available, wind them all at one time and lay them in order.
Cut a cardboard template the size of the stripe and have it handy to measure the width of the stripe making it unnecessary to count each pick.
Remember to taper each weft when joining a new strip. Join in new colors at the end of a row rather than the beginning of the next row. If weaving in the “eyebrows”, taper the ends of the weft before folding it in. Some thickness is normal.
To blend colors – start with one solid color, weave a few inches, add a print to the solid color, weave a few inches, then weave with a print alone. (Two thicknesses of weft will be used each time, whether in solid color or in print, to prevent rug areas from changing weight and thickness).
Always have a pair of scissors handy to taper ends of weft, snip off any bits of lint, etc. A pair of small, sharp scissors is better than a large pair.
To Previous Page in this Section